

How to deploy the small service, inside your own tenant, that creates each user's SharePoint Embedded container.
Overview
Microsoft changed SharePoint Embedded so that a mobile application can no longer create storage containers directly; creation must come from a service that authenticates itself, not just the signed-in user. To keep Notate's promise that your data never leaves your Microsoft 365 tenant and that Notate runs no server of its own, Notate provides a small provisioning service that you deploy inside your own tenant. It creates a user's storage container the first time they need one, and nothing more. It never sees your documents; those flow directly between the device and Microsoft. This procedure replaces the step in earlier releases where an administrator simply ran Notate to complete storage setup.
Plan for about 30 minutes. Nearly everything is done in your browser: the Microsoft Entra and Azure portals and the browser-based Azure Cloud Shell. The one exception is Step 4, which runs a short PowerShell script on your computer which Cloud Shell cannot do. Every security-relevant action is a visible, individually reviewable step.
What you will set up
-
A provisioning application (Microsoft Entra): a single-purpose identity with exactly one Graph permission, to create, read and write storage containers of Notate's type. It holds no application-level permissions and cannot read mail, files, sites, or the contents of any container.
-
A provisioning function (Azure): a small serverless Azure Function that creates a container on behalf of an authorized, signed-in user. It runs about once per user, ever, so it costs effectively nothing.
-
A passwordless credential: the function proves its identity with its Azure managed identity, so there is no secret to store, rotate or leak.
-
An access list: you choose, with standard Entra assignment, exactly who may have a container provisioned.
The security model, for your security team
-
Nothing leaves your tenant. The service runs on your Azure, under your control. Notate hosts nothing and holds no credential of yours.
-
No standing master key. The service creates user-owned containers and keeps no standing access to them. No single credential can read everyone's data. The credential that reaches SharePoint Embedded is keyless: a managed-identity federated credential.
-
Least privilege, visible on the consent screen. The provisioning application requests exactly one delegated Graph permission and no application permissions.
-
Content-blind by construction. The service is never granted permission to read or write document content, only to create and manage the container object.
-
You control who can provision. Access is standard Entra assignment and composes with your Conditional Access, MFA and access-review policies.
Prerequisites
-
A web browser. All steps except Step 4 need nothing else.
-
For Step 4 only: PowerShell on your computer, either PowerShell 7 (Windows, macOS or Linux) or Windows PowerShell 5.1, with Microsoft's Graph module installed:
Install-Module Microsoft.Graph.Authentication -Scope CurrentUser -
Microsoft Entra role: Global Administrator, or Application Administrator together with Cloud Application Administrator.
-
Azure: a subscription, and the Contributor role on the resource group you deploy into.
-
SharePoint Embedded billing already configured (see Setting up SharePoint Embedded billing).
-
Microsoft Entra ID P1 only if you want to grant access by group. Per-user assignment works on any tier.
-
From Notate: the code package
notate-provisioning.zip, the deployment templatemain.bicep, and the registration scriptSet-NotateContainerTypeRegistration.ps1, all on the SharePoint Embedded resource kit page.
Fixed Notate identifiers (the same for every customer)
|
Name |
Value |
|---|---|
|
Notate mobile application ID |
|
|
Notate container type ID |
|
Some steps produce values that later steps need; those are marked Record this.
Step 1: Create the provisioning application (Entra portal)
-
In the Microsoft Entra admin center, open App registrations. Select New registration. Name: Notate SPE Provisioning. Supported account types: single tenant only. Register. Record this: the Application (client) ID, referred to below as the provisioning app ID.
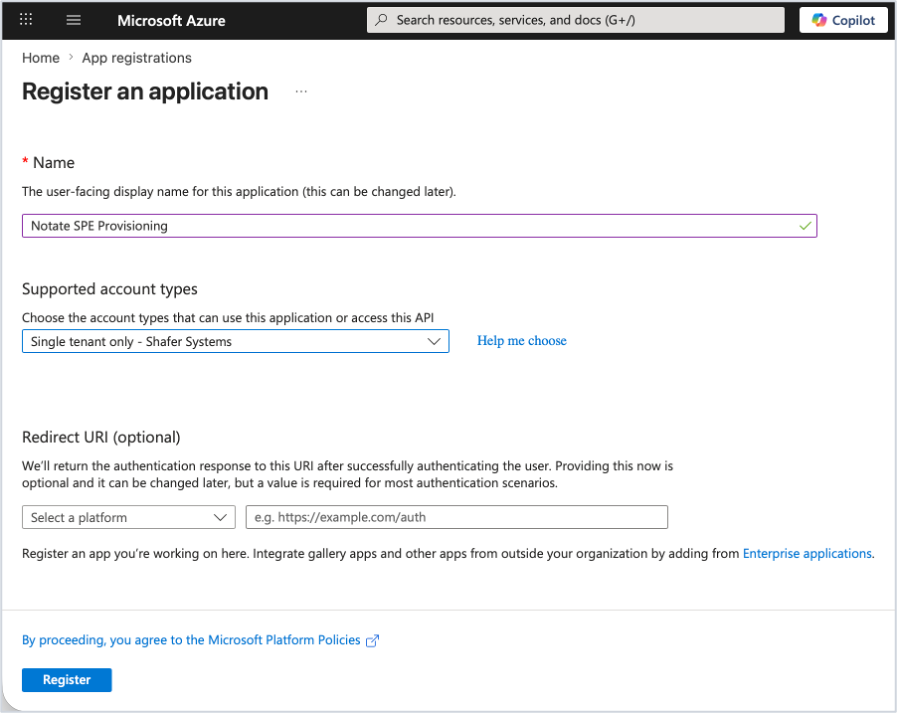
Registering the provisioning application: single tenant only, no redirect URI -
API permissions: Add a permission, Microsoft Graph, Delegated permissions, search for and add
FileStorageContainer.Selected. Then remove the defaultUser.Readso exactly one permission remains. Select Grant admin consent for your organization and confirm the row shows green.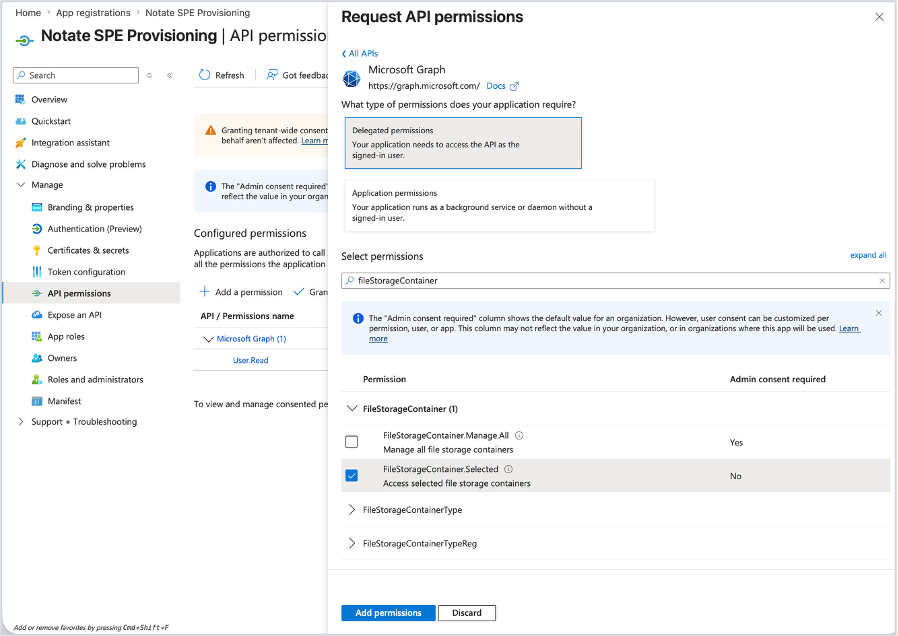
Adding the single delegated Graph permission, FileStorageContainer.Selected 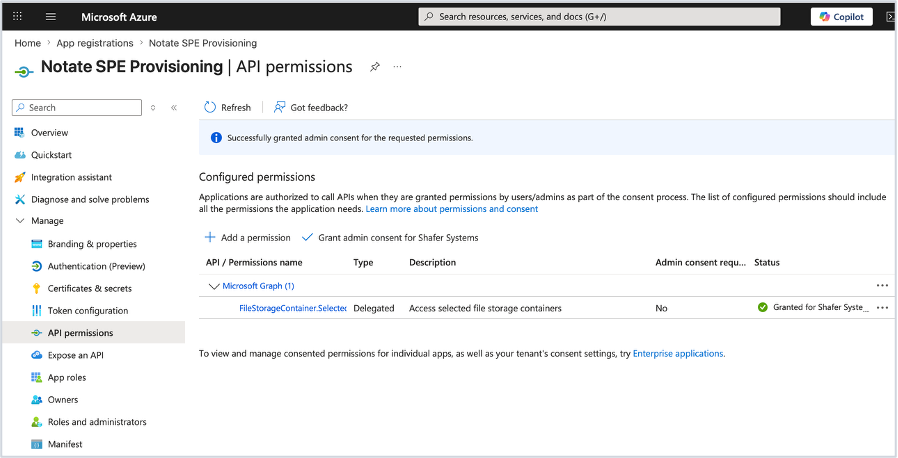
The finished permission list: exactly one permission, with admin consent granted. -
Expose an API: next to Application ID URI select Add, accept the default
api://<provisioning app id>, and Save. Then select Add a scope and enter the values in the table below.
|
Field |
Value |
|---|---|
|
Scope name |
|
|
Who can consent? |
Admins and users |
|
Admin consent display name |
Provision the signed-in user's Notate container |
|
Admin consent description |
Allows the app to request container provisioning on behalf of the signed-in user. |
|
User consent display name |
Provision your Notate container |
|
User consent description |
Allows the app to request container provisioning on your behalf. |
|
State |
Enabled |
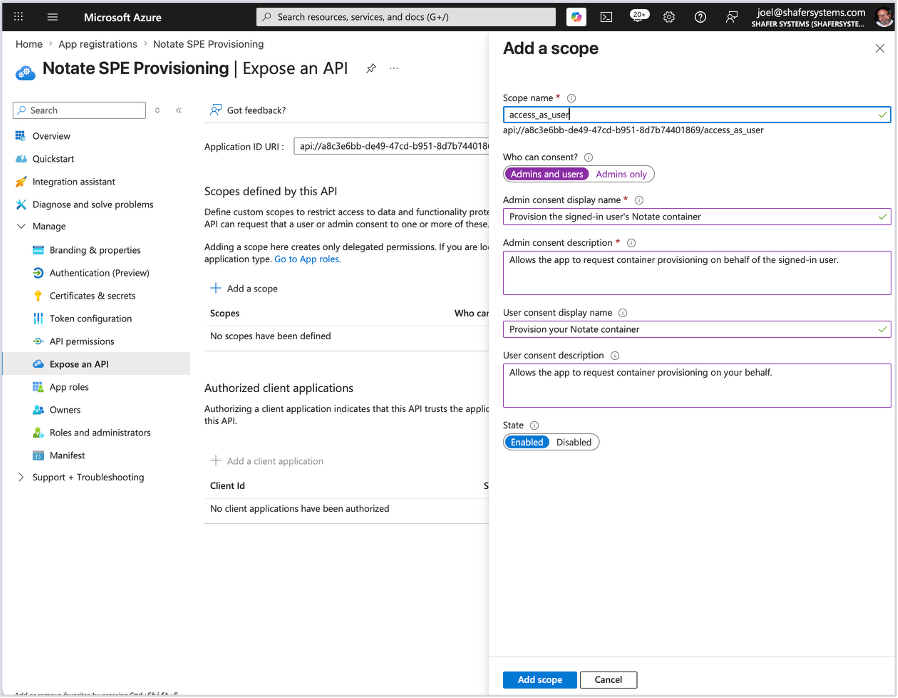
-
Still under Expose an API, select Add a client application, paste the Notate mobile app ID
215843d3-1ef5-43d0-9b0f-76d16094ae79, tick theaccess_as_userscope, and Add.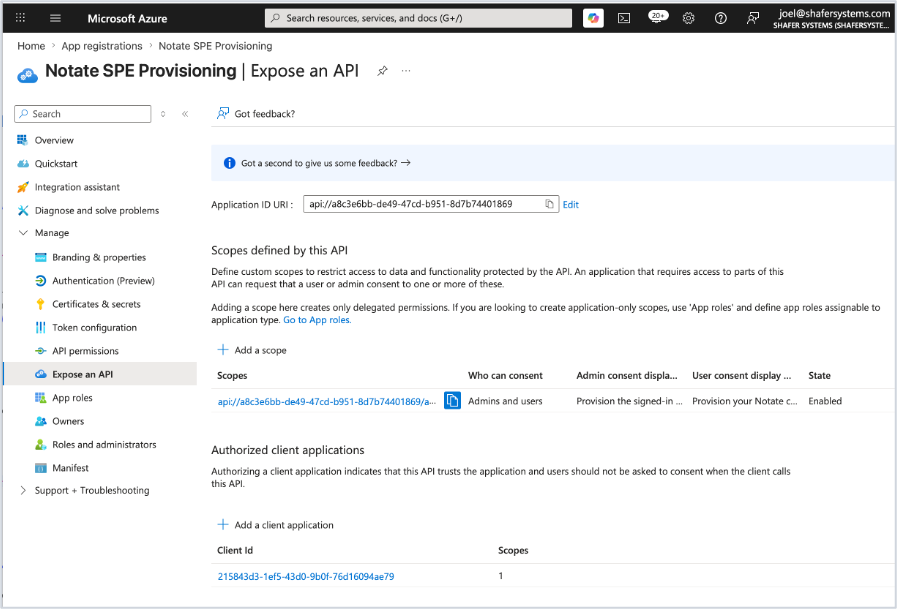
Expose an API when complete: the scope is defined and the Notate mobile app is authorized as a client -
Manifest: in the Microsoft Graph app manifest, under
api, setrequestedAccessTokenVersionto2and Save. In the older "AAD Graph" manifest view the same property is namedaccessTokenAcceptedVersion. This pins the token format the provisioning function expects.
No client secret. None is created. The sensitive credential is wired up passwordlessly in Step 3.
Step 2: Deploy the provisioning function (Azure Cloud Shell)
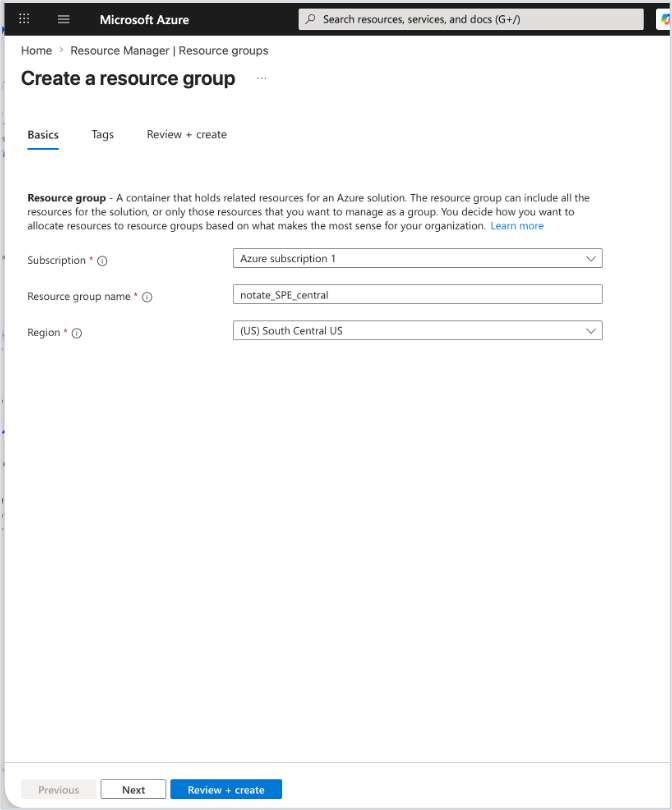
Open the Azure portal, choose or create a resource group, then open Cloud Shell (the >_ icon in the top bar; choose Bash). Cloud Shell runs in your browser; nothing to install.
Pick the region deliberately. The function deploys into the resource group's region, and your subscription must have App Service quota there (at least one instance). Many subscriptions have zero quota in some regions, which fails the deployment before anything is created. If you have no reason to prefer a region, create a fresh resource group in a major one, such as East US 2 or South Central US.
-
Upload
main.bicepandnotate-provisioning.zipwith the Cloud Shell Upload button (Manage files, Upload).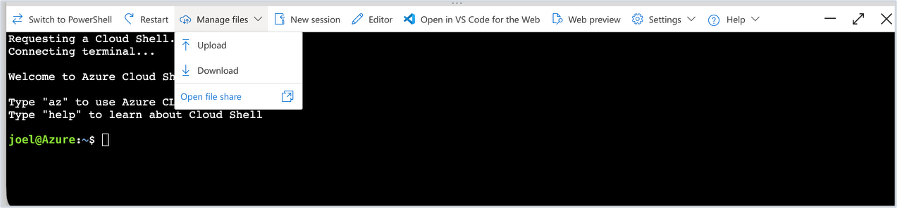
Uploading the deployment files through the Cloud Shell Manage files menu -
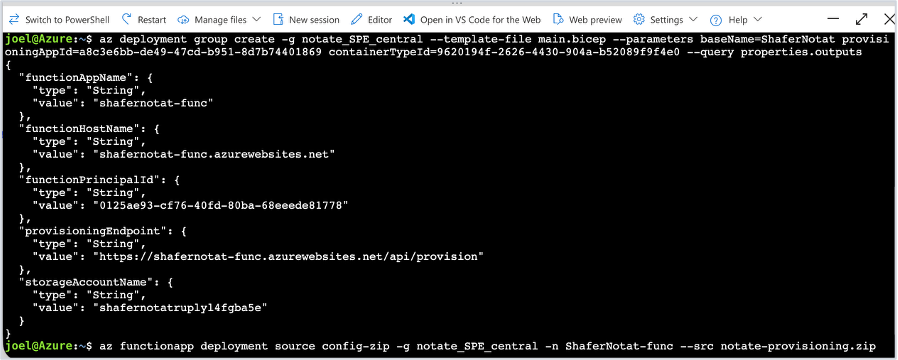
Choose a base name. It names every resource the deployment creates (
<base-name>-func,<base-name>-logs, and a storage account). Then run the deployment command below. Record this from the output:provisioningEndpoint(used in Step 6) andfunctionPrincipalId(used in Step 3).
Base name rules. 3 to 11 characters, lowercase letters and numbers only. Include something unique to your organization, for example contosodocs. No underscores, spaces or capitals; several Azure resource types reject them. The name must be globally unique enough that <base-name>-func.azurewebsites.net is not already taken by anyone, including a previous Notate deployment of your own. The resource group name has no such restrictions.
az deployment group create -g <resource-group> --template-file main.bicep \
  --parameters baseName=<base-name> \
               provisioningAppId=<provisioning app id> \
               containerTypeId=9620194f-2626-4430-904a-b52089f9f4e0 \
  --query properties.outputs
-
Deploy the code with the command below.
Bashaz functionapp deployment source config-zip -g <resource-group> \ -n <base-name>-func --src notate-provisioning.zip
-
Confirm it is running and protected with this command. It should return
HTTP/2 401: the function correctly rejecting an unauthenticated call.Bashcurl -si https://<base-name>-func.azurewebsites.net/api/provision -X POST | head -1
Step 3: Wire the passwordless credential (Entra portal)
This tells the provisioning application to trust the function's managed identity, so the function creates containers with no secret. In App registrations, open Notate SPE Provisioning, then Certificates & secrets, Federated credentials, Add credential.
-
If a "Managed identity" scenario is offered: select it, pick the function's managed identity (
<base-name>-func), name itnotate-function-mi, and select Add. Done. -
Otherwise choose "Other issuer" and enter exactly: Issuer
https://login.microsoftonline.com/<your-tenant-id>/v2.0; Subject identifier: the function's managed-identity object ID, which is thefunctionPrincipalIdvalue from the Step 2 output (also shown in the portal under the function's Identity blade as Object (principal) ID); Audienceapi://AzureADTokenExchange; Namenotate-function-mi. Add.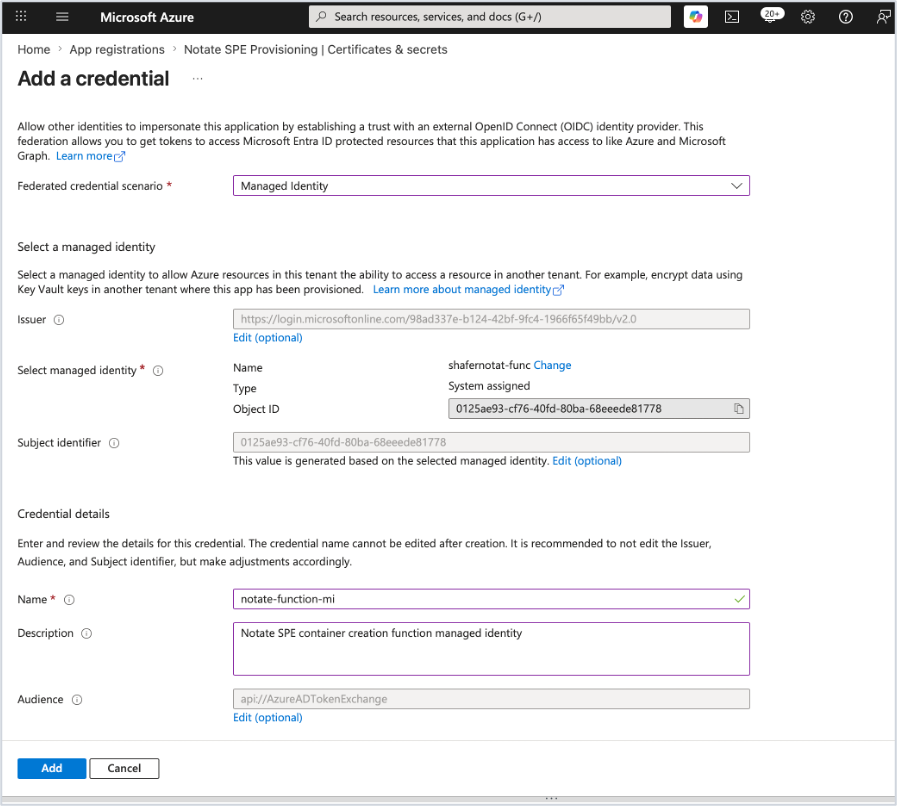
Adding the federated credential using the Managed Identity scenario (example values shown
After this step there is no password anywhere in the system for the sensitive operation.
Step 4: Register Notate's container type in your tenant (PowerShell)
This step authorizes both the Notate app and the provisioning application to work with Notate document storage in your tenant. It grants the provisioning application only create, read, write and delete on the container object, never content access, and leaves the Notate app's existing access unchanged.
This is the one step that runs on your computer rather than in the browser. SharePoint Embedded requires the registration call to come from the Notate application's own identity, so the script signs you in through the Notate app interactively, and that sign-in must return to a browser on the same machine, which Cloud Shell cannot do. There is no secret involved; it is an ordinary administrator sign-in.
-
Open a terminal in the folder containing the script (see Prerequisites for the one-time module install).
-
Run the command below. On Windows PowerShell 5.1 use
powershell -Fileinstead ofpwsh -File. If you are already at a PowerShell prompt,./Set-NotateContainerTypeRegistration.ps1 …works directly.Bashpwsh -File Set-NotateContainerTypeRegistration.ps1 \ -TenantId <your tenant id> -ProvisioningAppId <provisioning app id> -
Sign in as an administrator in the browser window that opens.
-
The script prints exactly the permissions it will write and asks for confirmation: the Notate mobile app receives delegated full access (unchanged from what the app has today) and the provisioning application receives delegated Create, Read, Write and Delete only. Review and confirm with
y.
Safe to re-run. The registration is performed once per tenant. Re-running is always safe; the script shows the resulting permission set before applying it.
Step 5: Choose who can provision a container (Entra portal)
-
In the Entra admin center, open Enterprise applications and then Notate SPE Provisioning.
-
Properties: set Assignment required? to Yes and Save. Set Visible to users? to No.
-
Users and groups: Add user/group and assign the users, or a group, who may use Notate document storage.
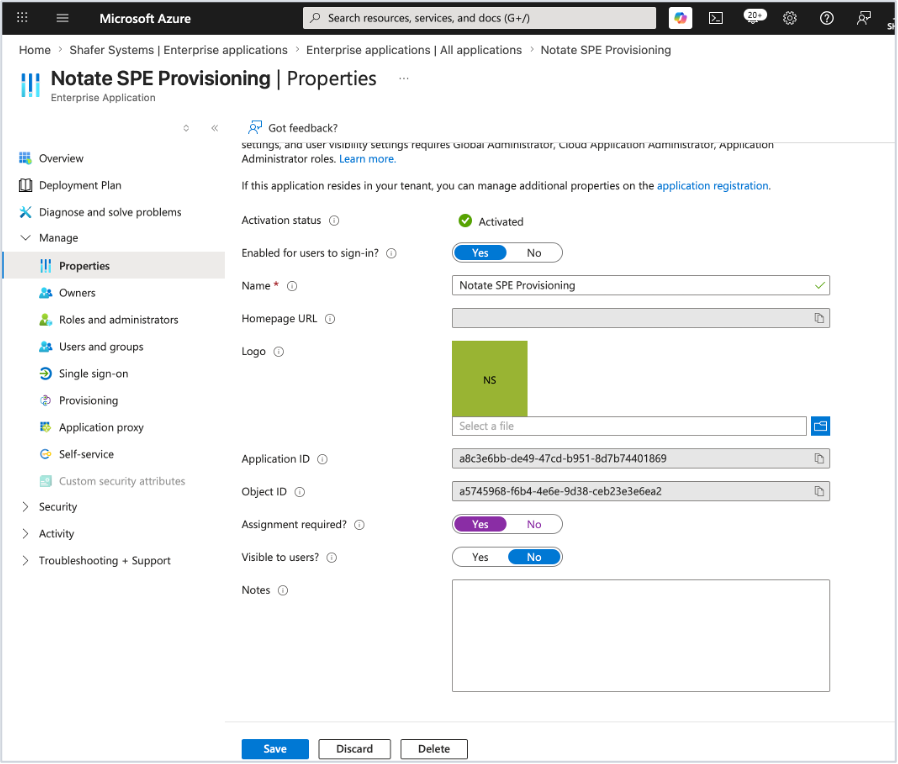
The enterprise application’s Properties: Assignment required = Yes; Visible to users = No.
-
Granting to a group requires Microsoft Entra ID P1. A dynamic group (for example, all of the Legal department) keeps the list current automatically.
-
Only direct members of an assigned group are included; nested groups are not expanded. Prefer one flat group or a dynamic group.
-
Removing someone later stops new provisioning; it does not remove access to a container they already have. Use account disable or sign-in revocation for that.
-
Optionally target this application with a Conditional Access policy (MFA, compliant device).
Step 6: Publish the two settings to your devices
In your MDM console, set the two Notate app-configuration values below. These are the only two values you carry between systems.
|
Setting |
Value |
|---|---|
|
|
The |
|
|
The provisioning app ID from Step 1 |
Step 7: Verify
Sign in to the Notate app on a device as a pilot user you assigned in Step 5. Their storage container is created automatically on first launch; they can create and open documents immediately. A user you did not assign is told their administrator has not enabled document storage for their account.
What your users experience
-
Assigned user: on first launch their container is created automatically and invisibly. No setup, no prompts.
-
Unassigned user: a clear message that their administrator has not enabled document storage. Assign them (Step 5) and they are set on next launch.
Troubleshooting
|
Symptom |
Cause and fix |
|---|---|
|
Step 2 deployment fails with |
Your subscription has no App Service quota in that resource group's region. Deploy into a resource group in another region, or request a quota increase (Portal, Quotas, App Service; going from 0 to 1 is usually approved quickly). Preflight failures create nothing; safe to re-run. |
|
The Step 2 curl check returns something other than 401 |
Connection error: the function may still be starting; wait a minute. A 200 or 403 without a token: Easy Auth did not enable; re-run the Step 2 deployment. |
|
A user sees "storage not enabled" but you did assign them |
Assignment can take a few minutes to propagate. Also confirm they are a direct member of the assigned group; nested groups do not count. |
|
First document is slightly slow to appear on a new account |
Normal. A brand-new container takes a short time to become fully available; it resolves on its own. |
|
The function logs an auth error after Step 3 |
The federated credential's Issuer, Subject and Audience must match exactly; re-open Step 3 and confirm them against the Step 2 output. |
|
Step 7 returns 401 even though the sign-in succeeded |
Confirm Step 1 sub-step 5: |
|
Step 4 fails with a permission error |
The signed-in account must be a Global Administrator (or SharePoint Embedded Administrator). Sign out of the browser session it opened and re-run with an admin account. |
Day-to-day operations
-
Add or remove access: the assignment in Step 5.
-
Monitoring and audit: the function's Application Insights logs every provisioning event (who, which container, created or existing). Entra sign-in logs show anyone who requested access but was not assigned (error AADSTS50105).
-
Credentials: the sensitive credential is passwordless (managed identity); nothing to rotate.
-
Removing the service: delete the resource group and the provisioning application, remove the application's grant from the container-type registration, and remove the two device settings.
Reference: values you produced
|
Value |
From |
Used in |
|---|---|---|
|
Provisioning app ID |
Step 1 |
Steps 2, 3, 4, 5, 6 |
|
|
Step 2 output |
Step 3 |
|
|
Step 2 output |
Step 6 |
Next: Container administration, security and compliance.